Allps Setups: MaxCollect General
1. Overview
This section guides you through configuring MaxCollect's general settings for seamless integration with Allps.
For a
visual demonstration of this setup process, please watch
our video tutorial here:
2. General Settings Configuration
To access and configure the general MaxCollect settings:
-
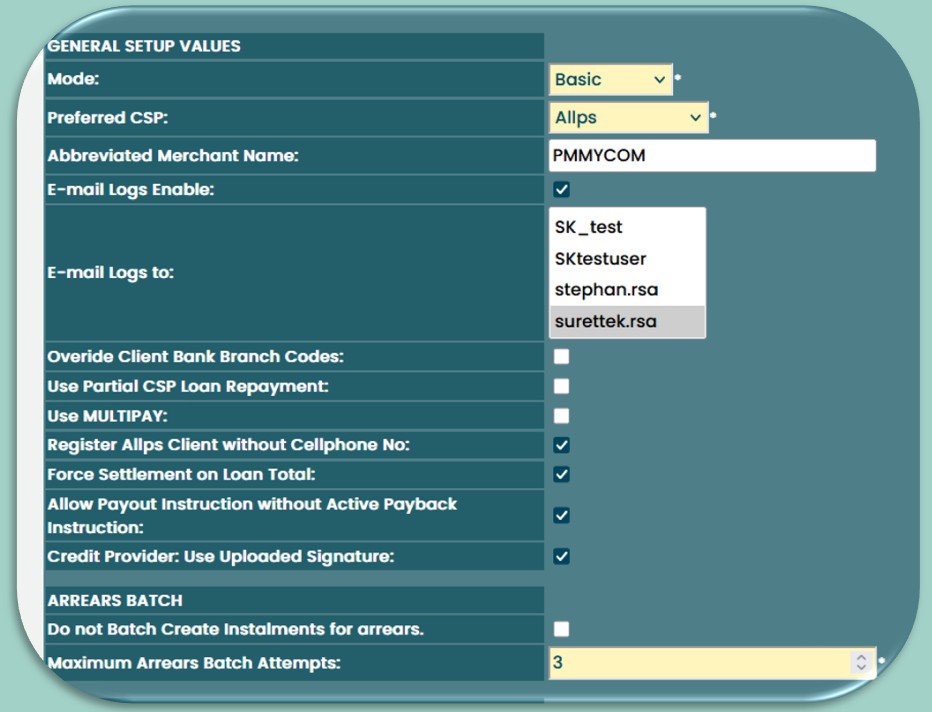
Navigate to Setups > MaxCollect > General.
-
Adjust the following fields:
-
Mode: Set this to Basic.
-
Preferred CSP: Select Allps.
-
Abbreviated Merchant Name: This field is not applicable to the Allps integration.
-
Email Logs to: If applicable, select a user with an email address to receive daily system logs with each integrated receipt run.
-
Override Client Bank Branch Codes: This setting is not applicable to the Allps integration.
-
Use Partial CSP Loan Repayment: Enable this option to allow specifying a lesser amount for loan deductions during repayments. (Previously applicable to EDO.)
-
User Multipay: This was previously applicable to EDO.
-
Register Allps client without cellphone No.: Use this option with eWallet to register clients without cellphone numbers.
-
Force Settlement on Loan total: Use this with integrated receipts to settle loans when the amount received exceeds the loan total.
-
Allow payout instruction without active payback instruction: Enable this to create payout instructions even when there is no active payment collection.
-
Credit Provider: When enabled, the system will use the uploaded signature from the user's profile for loan agreements.
-
General Setup Log: View changes made to the MaxCollect General Setup.
-
3. Arrears Batch
A dedicated ARREARS BATCH section has been added to the MaxCollect settings:
-
Do not Batch Create Instalments for arrears: If this checkbox is selected, the batch process will not run for this Legal Entity (MLE). The default setting for this option is True (checked).
-
Maximum Arrears Batch Attempts: This field allows you to set the maximum number of times an arrears instruction will be created per loan. The default value is 36, but 3 attempts are recommended.
-
The arrears batch process is set to run automatically every day at 19:30 SAST as a scheduled task
3.1 Viewing User Logs
You can view and print reports of the arrears batch process logs:
-
Navigate to MaxMoney > Processing > Logs > MaxCollect Arrears Batch.
-
From this screen, you can review logs for processes that have run and print a detailed log report.
3.2 Arrears PII Generation Rules
Payment Instruction Information (PII) for arrears is automatically created and sent for outstanding loans that meet the following criteria:
-
Last Instalment Status: The most recent instalment on the loan has not been fully paid.
-
Due Date Condition: The DateDue of the outstanding instalment is prior to the current Batch Date.
-
PII Status: The existing PII status for that instalment is not CANCELLED, ON_HOLD, or DISABLED.
-
Amount Calculation: The amount designated for the Arrears PII is calculated as the loan instalment's AmountDue minus the AmountReceived.
-
Maximum Instalment Cap: If the calculated amount exceeds the predefined maximum instalment amount, the system will use the maximum instalment amount as the value for the PII instead of the higher calculated amount.
4. Automated Lender Signature
This document explains how to configure and utilize the automated Credit Provider signature feature within MaxMoney, streamlining the loan documentation process.
Purpose
This feature allows for pre-populating loan documents with a digital signature of the Credit Provider, eliminating the need for manual signature capture during the loan disbursement process. This is achieved through uploaded or captured signatures, offering efficiency and convenience.
4.1 User Signature Management
To manage user signatures:
-
Navigate to MaxMoney > Setups > Security > Users.
-
Select the desired user (Credit Provider).
-
Two new buttons are available:
-
"Upload Signature": Allows you to upload a pre-existing image file (e.g., PNG, JPG) of the user's signature.
-
"Capture Signature": Enables signature capture directly from an Allps terminal. Once the signature is successfully captured, the Finish button will be enabled, and you can click it to save the signature.
-
The user view includes an additional column indicating whether a signature has been uploaded or captured for a user.
4.2 Loan Flow Impact
The "Use Uploaded Signature" checkbox and the presence of a user signature directly impact the loan disbursement process:
-
Scenario 1: Automated Signature (Enabled and Signature Present) If the "Use Uploaded Signature" checkbox is enabled AND the user has either uploaded or captured their signature:
-
The loan flow proceeds as normal.
-
The Allps terminal will only prompt the Lender to sign.
-
The Credit Provider's pre-uploaded or captured signature will be automatically inserted into the loan documentation.
-
Manual Credit Provider signature capture is bypassed.
-
-
Scenario 2: Manual Signatures (Enabled, No Signature Present) If the "Use Uploaded Signature" checkbox is enabled BUT the user has not uploaded or captured their signature:
-
The loan flow will revert to the standard process.
-
Both the Lender and the Credit Provider will be prompted to sign via the Allps terminal.
-
-
Scenario 3: Manual Signatures (Disabled, Signature Present) If a signature is uploaded for the user, but the "Use Uploaded Signature" checkbox is disabled:
-
The loan flow will revert to the standard process.
-
Both the Lender and the Credit Provider will be prompted to sign via the Allps terminal.
-
4.3 Token Usage
To specify signature placement within loan documents:
-
Navigate to MaxMoney > Setups > Documents.
-
Edit the relevant loan documents.
The following tokens remain unchanged and are used to specify the signature placement:
-
{^Underline Credit Provider Signature^}: Inserts the Credit Provider's signature with an underline.
-
{^Plain Credit Provider Signature^}: Inserts the Credit Provider's signature without an underline.