Real Pay Payment Integration
RealPay Integration: MaxMoney Setup
Before you can use the MaxCollect Payment Integration, a few one-time setups must be completed.
For instant EFT payment collections in Botswana, view the documentation: Real Pay Instant EFT
Ledgers
Loan Payment Collection Ledger
Real Pay Merchant Account
A ledger for the Real Pay merchant account must be set up under Setup > Accounting > Financial ledgers.
-
Control Account Type: Bank Sub-Ledger
-
Financial Report: Statement of Financial Position
-
Display Financial Category on Report: Bank Control Account
-
VAT Type: None
Loan Payment Disbursed Ledger
-
Merchant CSP: Real Pay 2024 (for payment disbursement)
-
Merchant Reference: Obtain the Beneficiary Number for payment distribution from Real Pay.
-
Payout CSP Setup: This setup enables a user to perform a cash/other CSP payback type and a RealPay 2024 payout. (v15.4)
Events
Set up an event for each receipt type under Setup > Accounting > Financial event.
Loan Payment Disbursed
-
Debit: Capital Out
-
Credit: The Real Pay account
-
Event Attribute: Payment to Client Bank Account
Loan Creation Payment Received
-
Debit: The Real Pay Account
-
Credit: Debtors Control Account
-
Event Attribute: ENDO Receipt
Cash Box
Link the events to the relevant cash box(es).
Documents
Set up the mandate for each Real Pay type under Setup > Documents.
-
Event Attribute Type: ENDO Receipt
-
Language: English
-
CSP: Real Pay 2024
-
Enabled: Select this option.
-
Use Master Document: Select this option.
-
Master Document: The mandate for Real Pay Mandate.
Resources
Set up Roles. Refer to the Full Integration document for detailed instructions.
MaxCollect
Set up MaxCollect. Refer to the Full Integration document for detailed instructions.
CSP Users
Navigate to Setups > MaxCollect > CSP User. There must be one user for loan creations and a separate user for loan distributions.
Loan Creation CSP User
Add users who need to create loans per branch (if each branch has a separate merchant account) as follows:
-
Branch: Home branch
-
CSP: Real Pay 2024
-
CSP User Name: Obtain Client ID from Real Pay.
-
Password: Obtain Client secret from Real Pay.
-
CSP Payout User: Unselected
Loan Disbursement CSP User
Add one super user for the branch for electronic payment distribution to the borrower:
-
Branch: Home branch
-
CSP: Real Pay 2024
-
CSP User Name: Obtain Client ID from Real Pay.
-
Password: Obtain Client secret from Real Pay.
-
CSP Payout User: Selected
CSP (Payback Methods)
Navigate to Setups > MaxCollect > CSPs.
Create one CSP setup for Payback Type = ENDO Receipt.
-
Description: Real Pay 2024 ENDO + Branch Name
-
CSP: Real Pay 2024
-
Enabled: Yes
-
Payer Fee: Off
-
Payback Type: EnDO Receipt
-
Preferred Choice: Selected
-
Receipt Event: Choose the applicable event from the list.
-
Real Pay Product Code: Choose one of the following:
-
FNBENDO: Endo One Day (Service type - One Day)
-
FNBENDOSD: Endo Same Day (Service type - Same Day)
-
-
Action Time: 12:00:00
-
Merchant No: Obtain Beneficiary Number from Real Pay.
-
Batch User: Select a valid CSP User for the branch.
CSP General
Navigate to Setups > MaxCollect > General.
-
Preferred CSP: Real Pay 2024
-
Abbreviated Merchant Name: Obtain this from Real Pay. It will differ for each entity.
-
Select Override Client Bank Branch Codes.
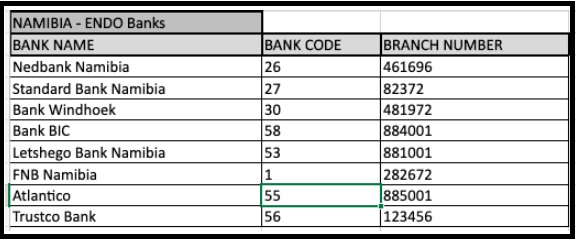
Real Pay Bank Setup (Translation)
Navigate to Setups > MaxCollect > Real Pay Bank Setup.
Real Pay EnDO Banks: Manage Real Pay in MaxMoney
Employer
Setup Employer
Go to Employer > Edit Employer > Payback Information.
-
Payback Type: ENDO
Client
Client Bank Detail
Set up bank information by navigating to Client Administration > Search for a Client > Edit Client > Banking.
-
Go to Edit Bank Account and complete all the information.
-
Only selected banks and branch codes are allowed.
-
Ensure the account type and account number are correct.
-
Select the Enabled checkbox, Preferred Choice checkbox, Payback and/or Payout Account checkbox, and the Register at RealPay checkbox. This is crucial when bank information is changed or added.
-
Click the Save button.
Loan Creation Banks
These are the FNBENDO/FNBENDOSD banks used for payback accounts:
Loan Disbursement Banks
These are the FNBENDPAY banks used for payout accounts:
Client Payback Detail
Navigate to Client Administration > Search for a Client > Edit Client > Payback Information.
-
Payback Type: ENDO
-
Preferred CSP: Real Pay 2024
Client Number
The Real Pay Client Number will differ as it uses the internal reference for uniqueness.
Client Cellphone Number
Real Pay only accepts contact numbers valid for the country.
-
Botswana: 267 with 8 digits or 0 with 8 digits.
-
Namibia: 264 with 9 digits or 0 with 9 digits.
New Loan
Create a loan under Client Administration > Search for a Client > New Loan.
-
The Payback Type must be EnDO Receipt.
-
The CSP must be Real Pay 2024.
-
The Preferred CSP Setup must be the specific CSP setup for the branch, unless the entire entity uses one merchant account and therefore only one Preferred CSP setup.
-
The Payment to Client must be the Real Pay payout event to distribute the capital amount to the borrower.
-
Payment to client: Select the event with the branch’s merchant account, unless there is only one event (one merchant account) for the entire entity.
-
Real Pay product code must be selected = FNB ENDO Payouts.
Loan Number
Refer to the full integration document for details on loan numbering.
Payback Instruction
View the payback instruction under Client Administration > Search for a Client > Loans > Payback Instruction.
The RealPay REST contract creation process has been modified so that MaxMoney automatically creates and adds installments for the associated loan after the contract is successfully created.
Process Payment Deduction Receipt Responses
Responses will be automatically processed by the back-end servers.
Note: "Processing: MaxCollect: Resubmission of Instalments" is only available for real-time debit orders on Real Pay (Botswana & Namibia).
View Unsuccessful Payment Deduction Receipt Responses
Logs:
-
Processing > Log > MaxCollect PHI Import: Highlight an entry and click on “Print Error”. These receipts must be recorded MANUALLY.
-
Processing > Log > MaxCollect DPH Import: Highlight an entry and click on “Details”.
View Successful Payment Deduction Receipt Responses
Logs:
-
Processing > Log > MaxCollect PHI Import: Highlight an entry and click on “Print Success”.
Receipt Report
You can generate receipt reports using the following:
-
Reporting > Accounting > Receipts between dates report
-
Reporting > Accounting > Detailed Ledger Report: Select your Real Pay Control Ledger.
-
Reporting > Loan > Receipt Detail report
Reconcile the Amount Received in the Bank
-
Verify that the amount received in your Real Pay control ledger matches what you've received in your bank account for a specific date. You can generate a:
-
Detailed ledger report: Under Reporting > Accounting > Detailed Ledger Report, select your Real Pay Control Ledger.
-
Detailed receipt report: Under Reporting > Accounting > Receipts between dates report, select the receipt/payback type = Real Pay EnDO.
-
-
Once your control ledger balances, you can post the amount for the day to the Real Pay bank account ledger. Do this under General Ledger > Process Transactions > Process a Transaction. Use the journal event you have set up.
FAQ
Troubleshooting: CSP Error
If you receive a CSP error in MaxMoney when attempting an inquiry:
-
If you don't understand the error, contact the CSP.
-
Gather the following information for troubleshooting: microlender name, client number, loan number, and the time the error occurred.
-
Obtain the URL from the Edit Client screen.
-
Obtain the URL from the Edit Loan screen.
-
Go to MaxAdmin > Admin XML Space > MaxCollect REST and look for errors on the entity.
Real Pay Status Code Responses:
-
200: API Call successfully processed by the server. Errors within the requested data may be present. Check the response message in the column with the heading “Detail”.
-
400: API Call successfully processed by the server, but errors are present in the request. Check the request and response message in the column with the heading “Detail”.
-
401: Unauthorized - Use OAuth2 Authentication to access the resource (OAuth 2.0 is a standard for online authorization that uses a token).
-
404: The specified resource was not found.
-
500: An Internal Server Error Occurred. Contact Real Pay Support.
-
503: Service Unavailable. Contact Real Pay Support.
To view errors in the response, click on “click here to view”. If you do not understand the error in the response, contact the Service Provider. When making the inquiry, send the request and response to them. Ensure you mask usernames, passwords, IDs, and keys with “XXX”. For example:
Request: {'params': {'ClientNumber': 527387, 'BeneficiaryUser':
'17433', 'Version': 'v1'}, 'data': None} Response:
{'ClientGetResponse': [{'ClientNumber': '527387', 'ClientName': 'lu
cankcnp', 'IDType': 'I', 'IDNumber': XXX, 'CellphoneNumber': '+26XXX',
'BankCode': 14, 'BranchCode': 290567, 'AccountType': '1', 'AccountNumber': XXX,
'AccountHolderName': 'Lu CankCNP'}], 'APIResponse': {'CallSequence': 12430829,
'Status': 'SUCCESS', 'Version': '1.0.0', 'Name':
'RPWS_CLIENTS.GET_CLIENTS'}}
Also, check the debug around the time the error occurred. Go to MaxAdmin > Maintenance & Processes > Status > Debug status. Click on Search.
If there are many errors, try to narrow them down by entering the date. If you have the client ID, user ID, or legal entity ID, you can enter that as well and click Search again.
Report errors in the debug to Mycomax Dev through the Google Chats Support channel. Ask them if you need to create a ticket. Provide dev/ticket with as much information as possible: Legal Entity Global ID, Client Number, Loan Number, Name of CSP, context of the error (i.e., what the user was trying to do when they received the error), and a screenshot of the error.
MaxCollect RP Rest Type
Navigate to MaxAdmin > Admin XML Space > MaxCollect REST.
-
Type: For integrated receipts, search for REST Instalments Report Retrieve.
-
94: Get Client
-
93: Put Client
-
92: Post Client
-
76: Get InstalmentChanges (Receipts)
-
74: Cancel Instalment
-
73: Edit Instalment
-
71: Get Contract
-
69: Add Contract
Real Pay Product Codes
To determine which product code is used:
-
Go to MaxAdmin > Admin XML Space > MaxCollect REST.
-
Click on Click Here to View.
-
The Product Code is displayed next to PostLink after the last forward slash.
Otherwise, use both the country and the financial event attribute description to find the product code.
If the request is not linked to a financial event attribute (e.g., put client), then the Real Pay Product Code on the CSP setup marked “Preferred Choice” is used.
MaxMoney Error
If you enabled this module and users suddenly start encountering errors:
-
Double-check the setups for this module.
-
User not Linked to Beneficiary User or User Inactive:
-
Is the CSP Merchant Number correct?
-
Is a CSP User linked to the MaxMoney user?
-
Is the user selecting the correct CSP setup when creating the loan?
-